bookme for Sales teams and SDRs
Outbound replies are the most perishable asset a sales team has. bookme lets a prospect book a qualified meeting straight from your first message or reply, and routes it to the right rep.
What you will learn
- Create an event type
- Ask the right questions before the meeting
- Connect your calendar so you never double book
- Set your hours and protect your week
- Share meetings across a team
- Automate reminders and follow ups
- Record what happened after each meeting
Who this is for
SDRs, BDRs, account executives, founders who sell, and sales managers who need meetings booked fast, spread fairly across the team, and qualified before anyone joins the call.
The scheduling problems in sales
A positive reply turns into a scheduling thread
Meetings are not shared fairly across reps
Reps meet unqualified prospects
No-shows and missed follow ups
Demos need several people
How bookme solves it
- Self booking from the first message. Put a direct link in your outreach and replies so the prospect picks a slot immediately. See how to share your booking link.
- Qualification up front. Intake questions capture company, role and need before the call. See how to create a question form.
- Team routing. On the Elite plan, team events and round robin spread bookings across reps, and collective events find one time for several hosts. See how to create a team event.
- Outcomes and follow ups. Record whether the meeting happened, was missed or needs a new time, and let the matching follow up email go out. See how to record a meeting outcome and how to use post meeting follow up emails.
- Reminders. Automated reminders before the meeting reduce no-shows. See how to create an email workflow.
See bookme in action
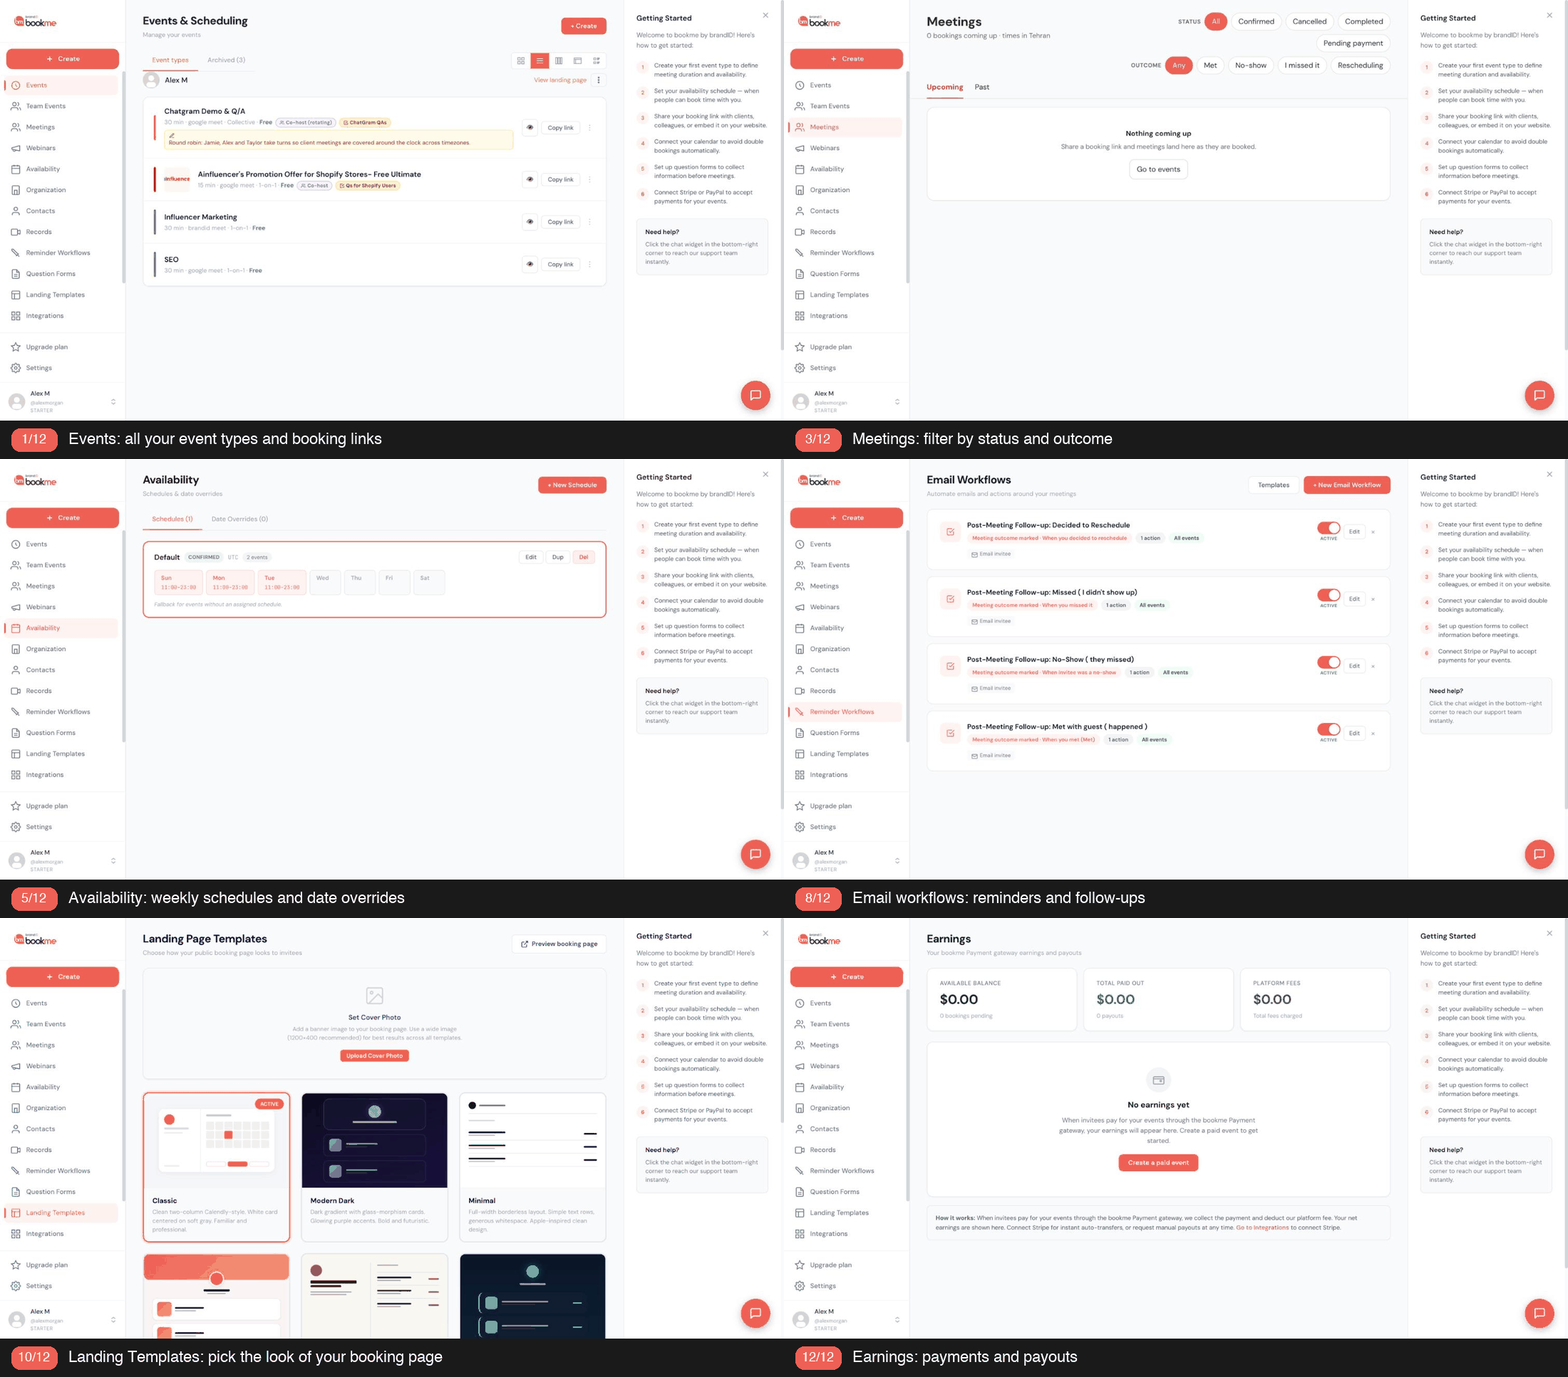
This short tour shows the dashboard you will use in the steps below: your events, meetings and settings in one place.
Set it up step by step
Create an event type
A single demo event is the destination for every positive reply.
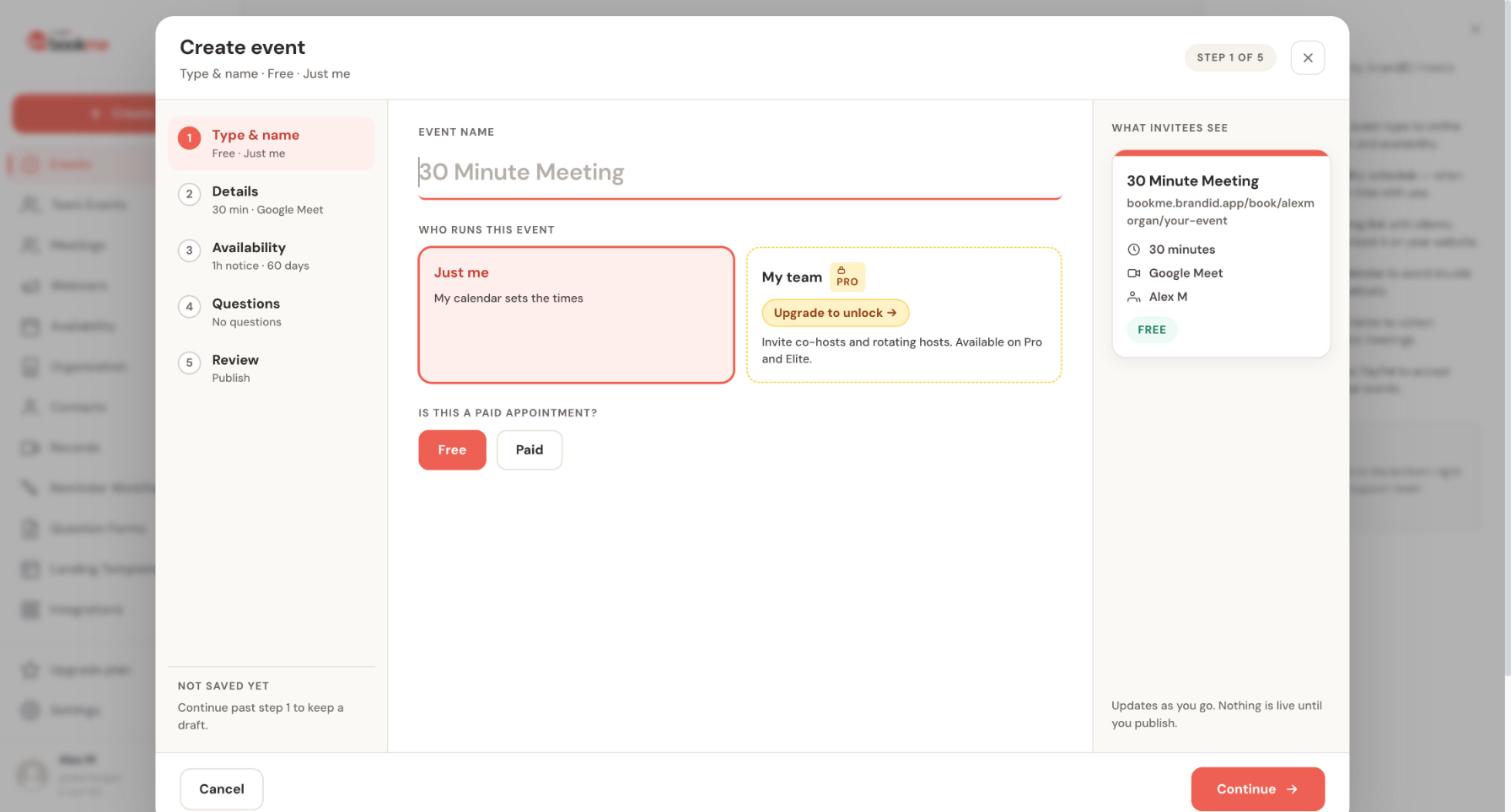
An event type is a meeting you offer, such as a 30 minute intro call. The Create event wizard builds one in five steps and keeps nothing public until you publish.
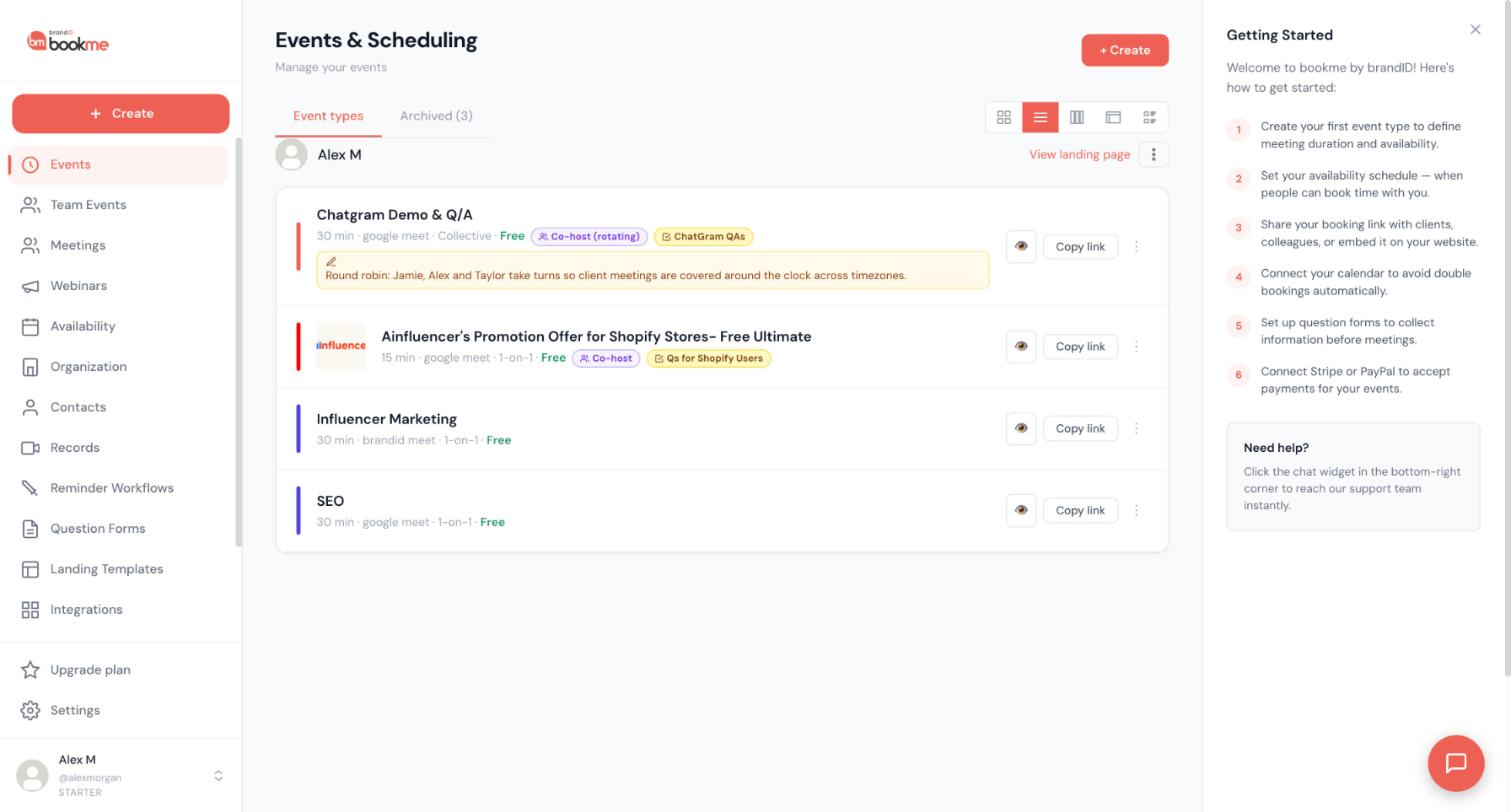
- On the Events page click + Create. The wizard lists five steps: Type & name, Details, Availability, Questions and Review.
- Name the event and choose Just me or My team, then choose Free or Paid.
- In Details set the description, the duration and the location: Google Meet, Zoom, brandID Meet, Phone call or In person.
- In Availability choose a schedule, how much notice you need, how far ahead people can book, an optional cap on bookings per day and buffers before and after each booking.
- Click Publish event, then use Copy link on the Events page to get the event’s direct link.
For sales:
- Create a 30 minute demo event and a shorter 15 minute intro call.
- Write the description in the prospect language, not internal jargon.
Full guide: how to create an event type.
Ask the right questions before the meeting
Qualification up front saves the first ten minutes of every call.
A question form adds your own questions to the booking page, so you know what you need before the meeting. You build it once and reuse it on as many events as you like.
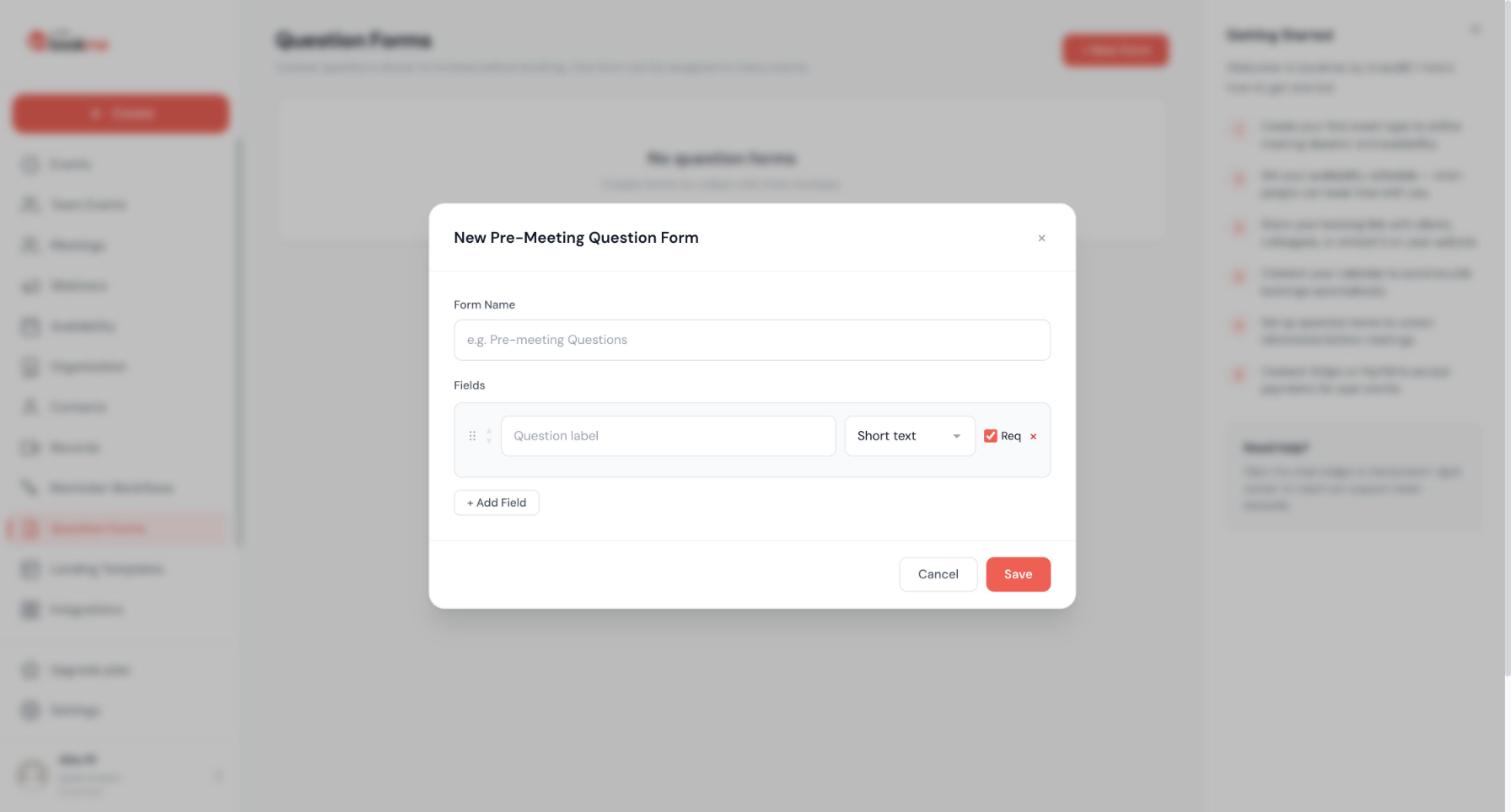
- Click Question Forms in the sidebar, then + New Form, and give the form a clear name.
- Add one row per question. Give each a label, choose a type (short text, long text, dropdown, radio or checkbox) and decide whether it is required.
- Keep it to three or four questions and put the most useful one first. Drag rows to change the order.
- Click Save, then assign the form to one or more event types, or pick it in the Questions step of an event.
- Read the answers in your calendar invite, your booking email, the invitee’s confirmation and the booking in Meetings under What they told you.
For sales:
- Ask company size, role, current tool and timeline.
- Put the question that decides fit first.
Full guide: how to ask the right questions before the meeting.
Connect your calendar so you never double book
Each rep needs a connected calendar so only truly free times appear.
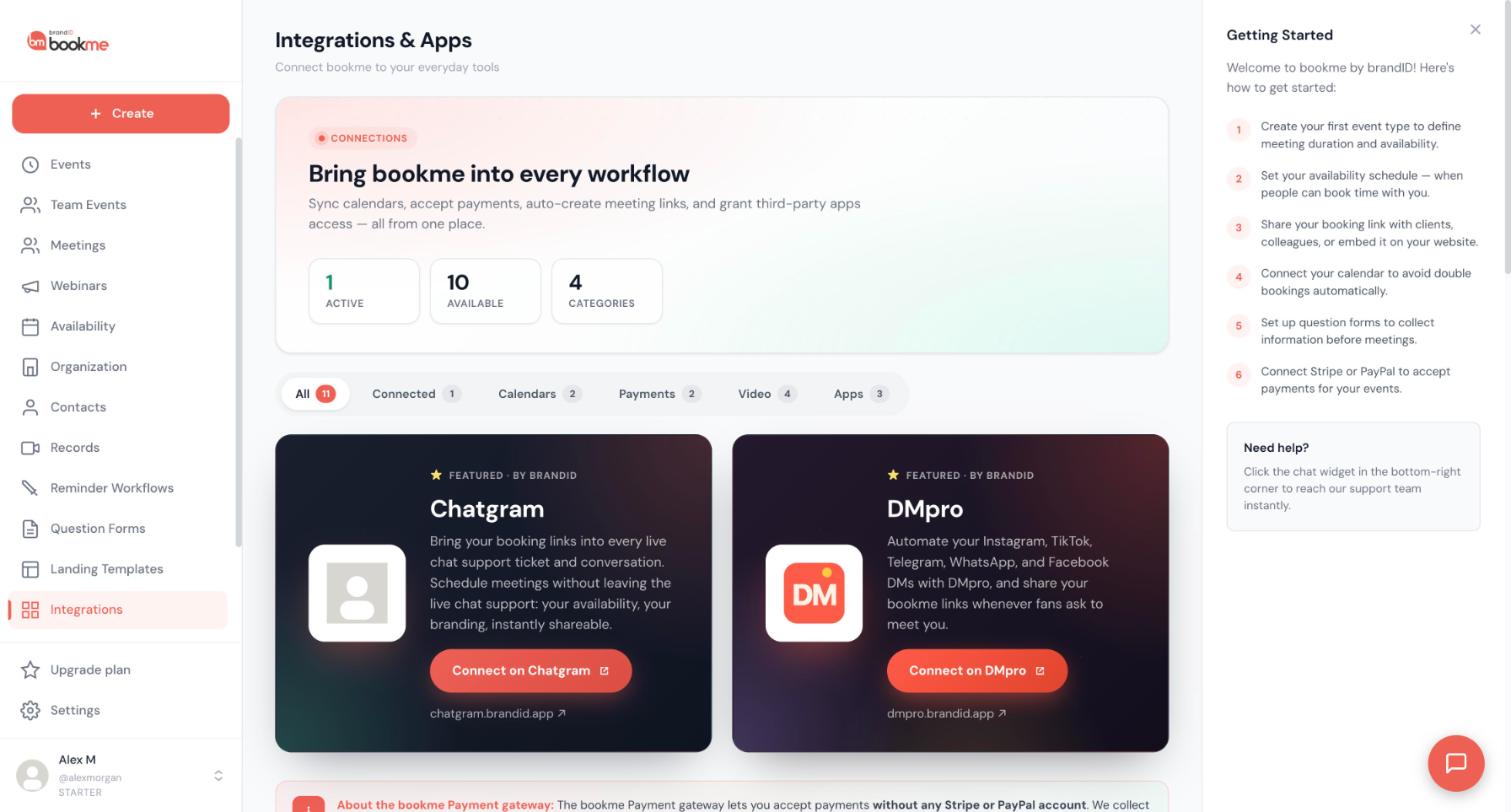
Connect your Google Calendar so bookme blocks the times you are already busy and adds every new booking to your calendar. It takes about a minute.
- Click Integrations in the sidebar and open the Calendars filter.
- Click Connect on the Google Calendar card, choose the account and approve access in Google.
- Your busy time starts blocking slots on your booking page, and new bookings are written to your calendar as they happen.
- Check the row’s status. If it says Needs reconnect, click Reconnect.
For sales:
- Have every rep connect Google Calendar before the event goes live.
- Check the status row says Syncing.
Full guide: how to connect your calendar so you never double book.
Set your hours and protect your week
Reps should not be overbooked by an open calendar.
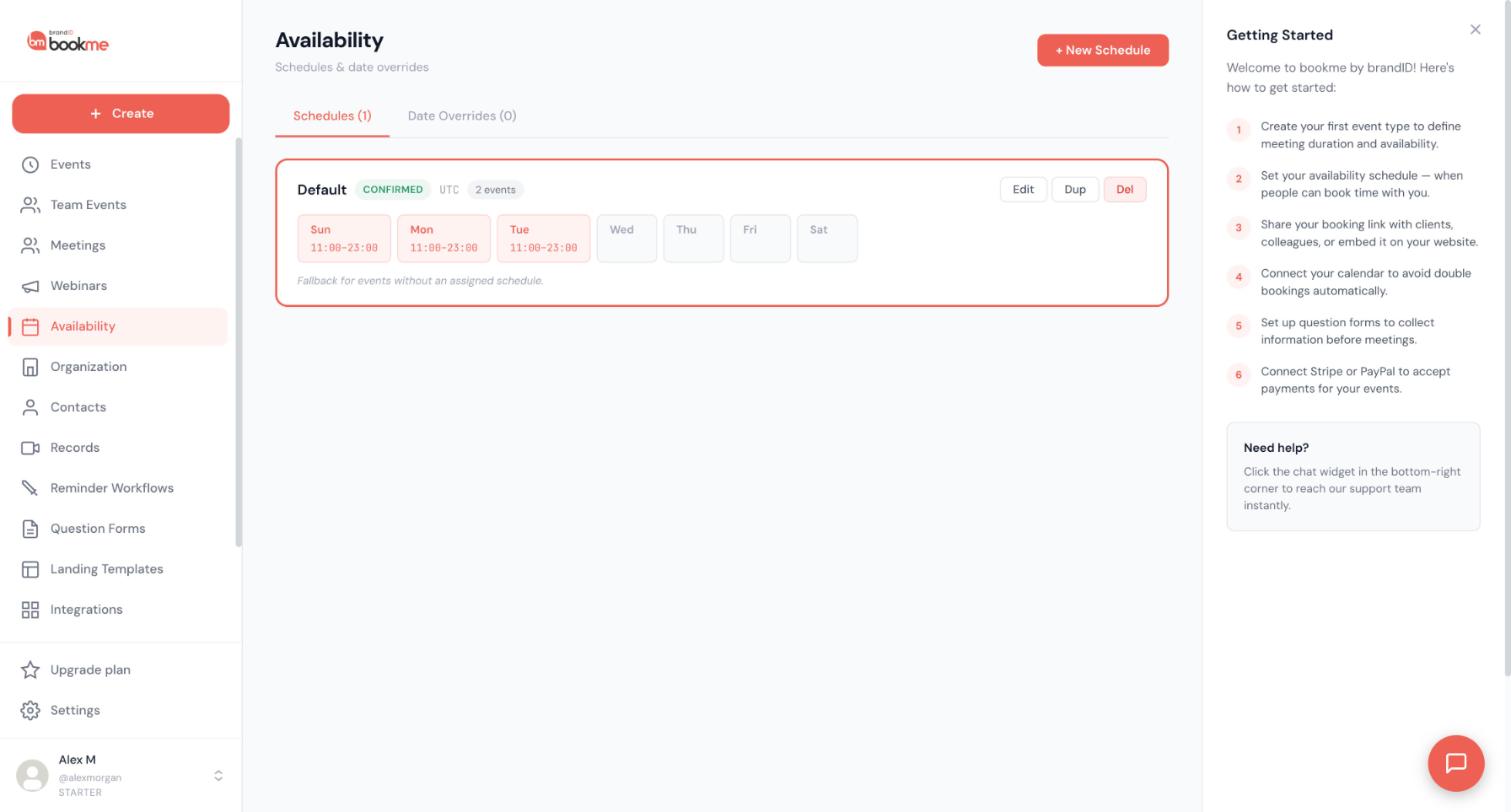
Your weekly hours decide which times invitees can book. You set them once in a schedule, and every event that uses that schedule follows it.
- Click Availability in the sidebar and press Edit on the Default schedule.
- Switch days on or off, set a start and end time, and add more than one time window to a day if you need a break in the middle.
- Use Copy to all to repeat one day’s hours on the others, and check the schedule’s time zone before you save.
- Click + New Schedule when some events need different hours, for example paid sessions only on certain days, then assign that schedule in the event’s Availability step.
- In each event, add a minimum notice, a limit on how far ahead people can book, a cap on bookings per day and buffers before and after.
For sales:
- Set weekly hours per rep and a daily cap on demos.
- Use buffers for prep and notes between calls.
Full guide: how to set your hours and protect your week.
Share meetings across a team
Round robin shares demos fairly, and collective events bring in a second person.
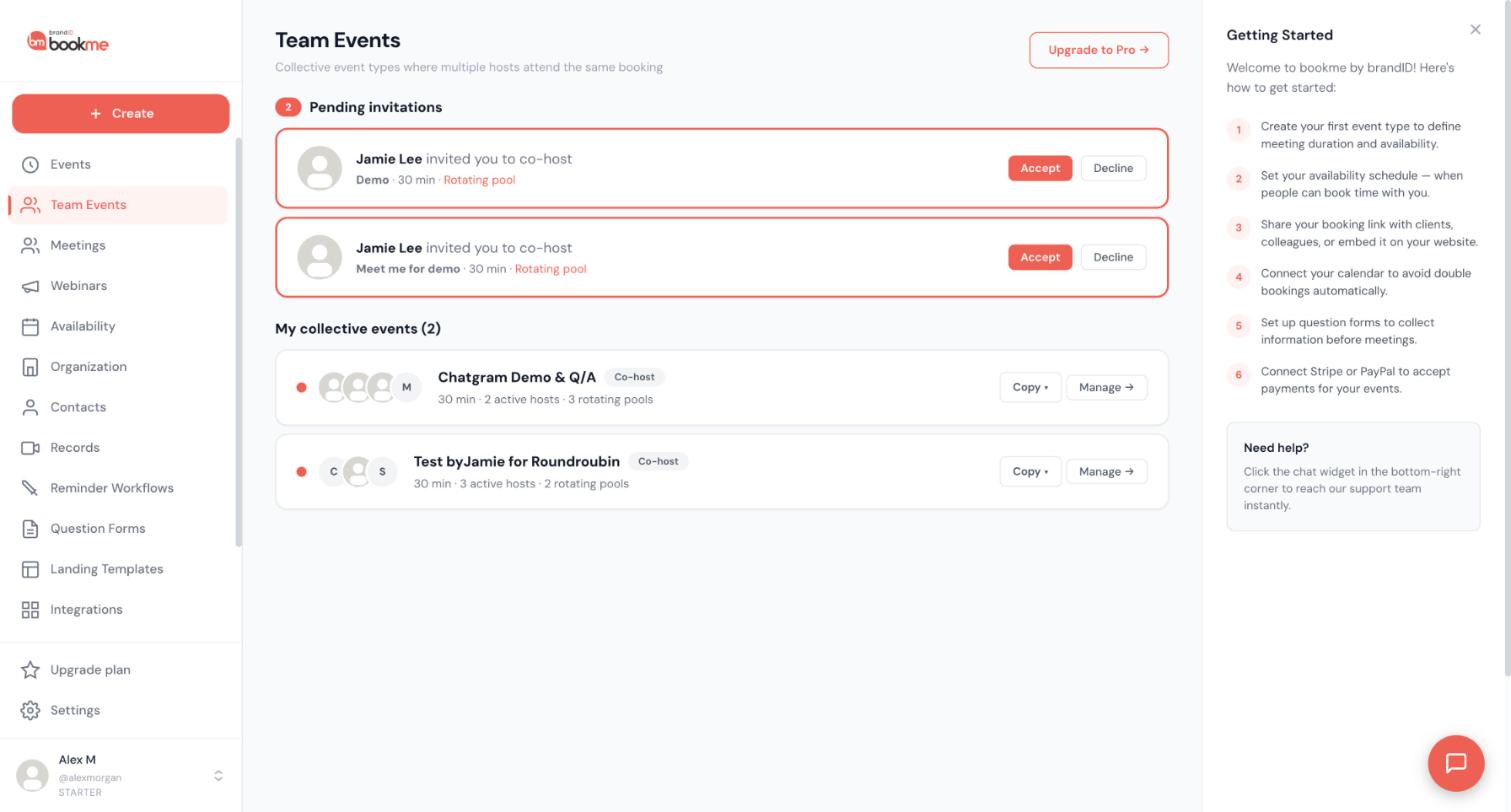
A team event lets several bookme users host the same booking, either all together or by taking turns.
- Check your plan first. Collective and round robin events are on the Elite plan.
- In the Create event wizard choose My team under Who runs this event.
- Choose how the team hosts: Everyone attends (collective), where a time is offered only when every required host is free, or Take turns (round robin), where one host takes each booking.
- Add co hosts by bookme username, by email or with an invite link. Each stays Pending until they accept.
- Publish the event, then manage it from Team Events.
For sales:
- Use round robin for first demos and collective for demos that need a solutions engineer.
- Check the host list before publishing, since invitations send on publish.
Full guide: how to share meetings across a team.
Automate reminders and follow ups
Reminders and no show follow ups protect the pipeline.
An email workflow sends an email when something happens around a meeting: before it, after it, or when it is booked, cancelled, rescheduled or marked with an outcome.
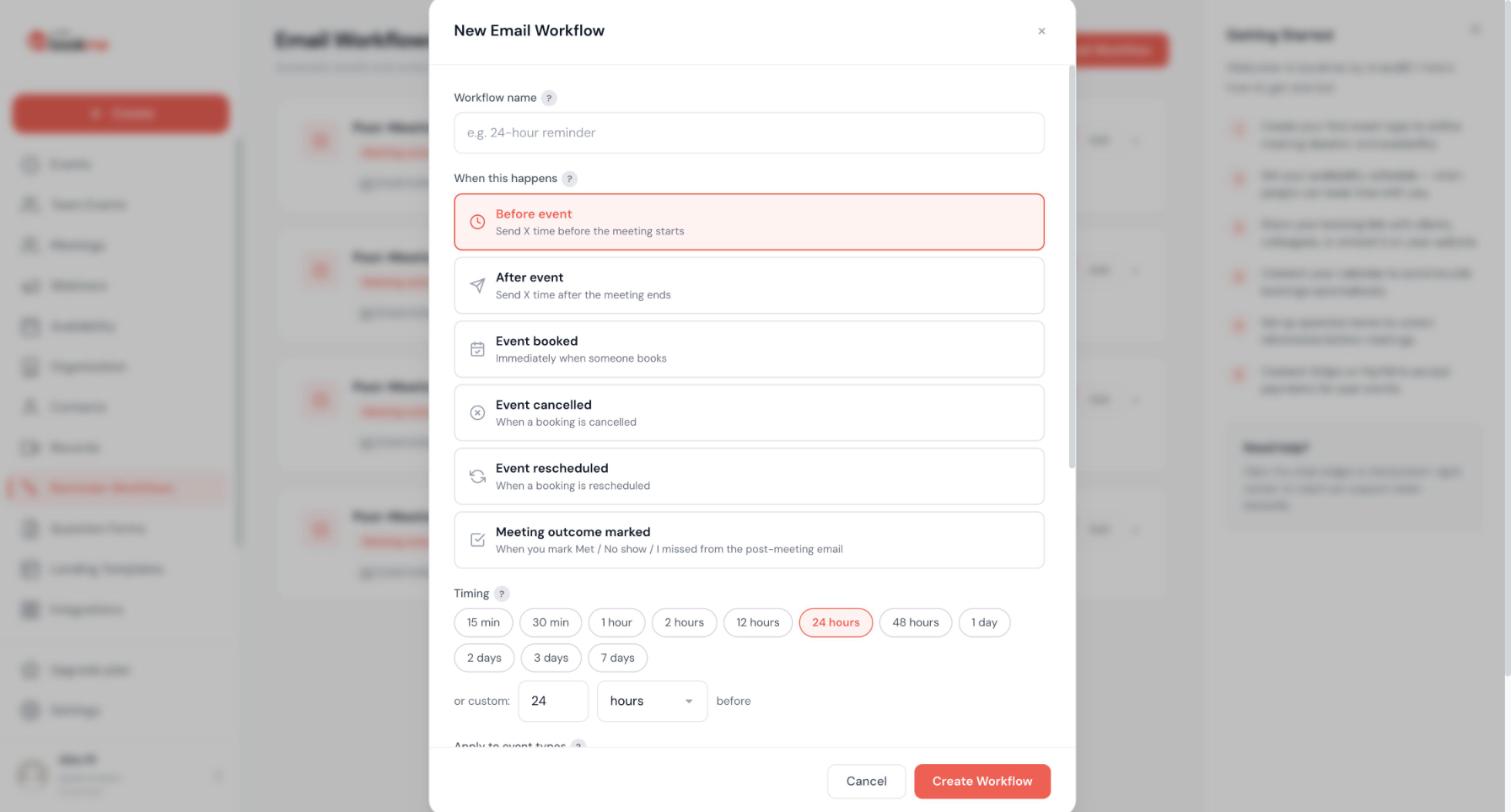
- Click Reminder Workflows in the sidebar, then + New Email Workflow, and name it, for example 24-hour reminder.
- Under When this happens choose a trigger: Before event, After event, Event booked, Event cancelled, Event rescheduled or Meeting outcome marked.
- For before and after triggers pick a timing chip such as 15 min, 1 hour or 24 hours, or enter your own.
- Choose which event types it applies to, leave it empty for all, and write the subject and body. You can insert merge variables such as {{invitee_name}} and {{event_name}}.
- Click Create Workflow and test it first with your own address.
For sales:
- Send a reminder before the demo and a rebook email after a no show.
- Edit the wording so it sounds like your team.
Full guide: how to automate reminders and follow ups.
Record what happened after each meeting
Recording what happened keeps follow ups consistent.
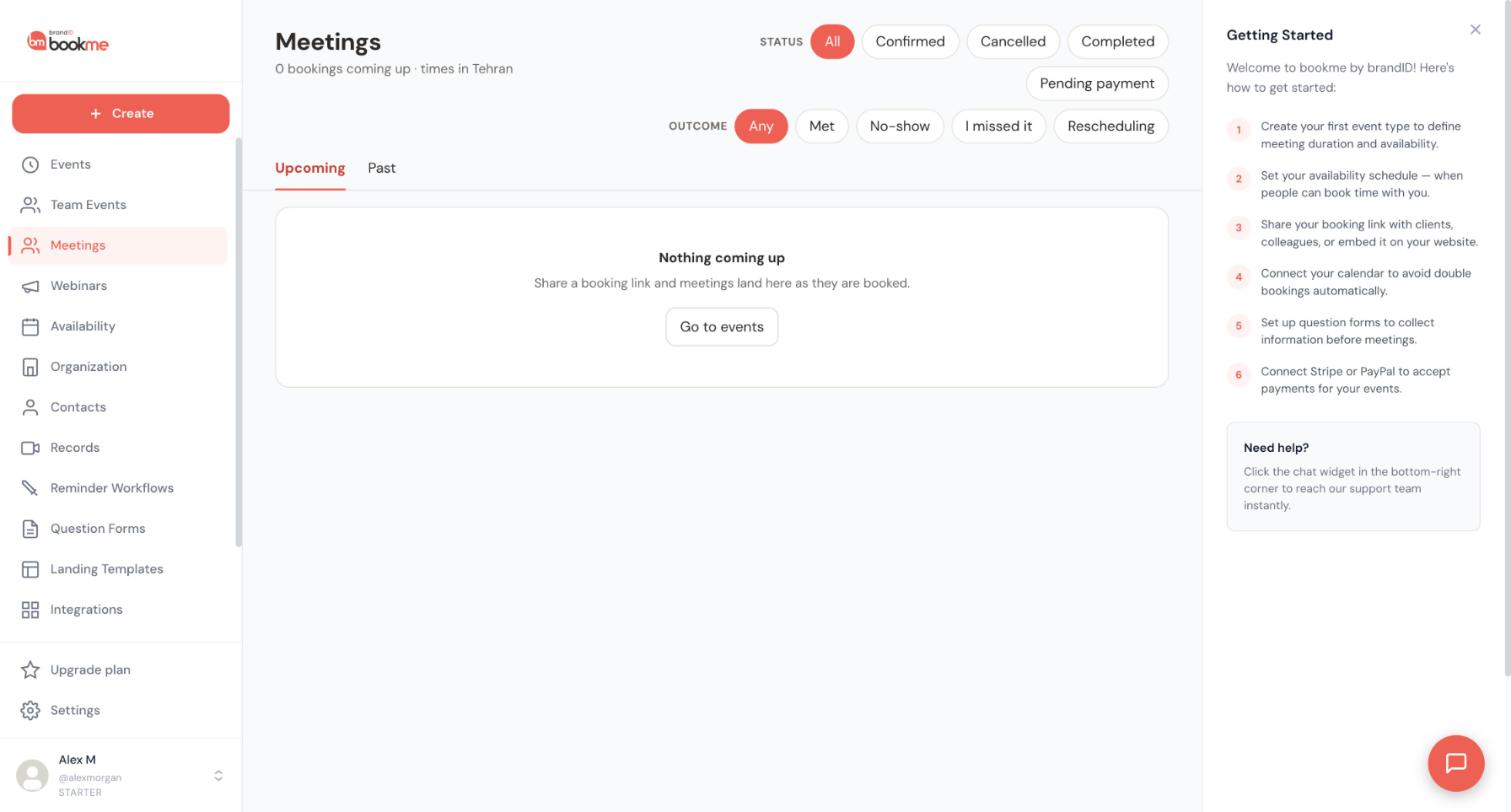
After a meeting ends, tell bookme what happened: Met, No-show, I missed it, or Decided to reschedule. Your answer sets the booking’s status and can send a follow up email to the invitee.
- Find the meeting that needs an outcome in the check in email sent five minutes after it ends, in the Just ended band on the Meetings page, or in the booking itself.
- Pick the outcome: Met, No-show, I missed it or Decided to reschedule.
- Review the window that opens. It shows a private note box and the follow up email exactly as the invitee will see it.
- Leave Email them now on to send it, or switch it off to save only your note.
- Later, use the Outcome filters on the Meetings page to review what happened.
For sales:
- Mark every demo as Met, No-show or Decided to reschedule.
- Use the Outcome filters to review the week.
Full guide: how to record what happened after each meeting.
Case study: a three person SDR team booking demos for one account executive
A small software company has two SDRs sending outbound sequences and one account executive running demos. Replies used to land in each SDR’s inbox, and the SDR would offer times by hand.
They create a 30 minute demo event with four intake questions: company size, role, current tool and timeline. The SDRs add the event’s direct link to the closing line of every sequence step and to every positive reply. For demos that need the account executive and a solutions engineer, they use a collective team event so the prospect only sees times when both are free.
After each demo, the account executive records the outcome. Prospects who met get a thank you with next steps, no shows get an invitation to rebook, and anyone who needs a new time gets a reschedule note. The sales manager reviews the monthly booking report for the team.
Launch checklist for sales
Tick these off before you share your link.
- The demo event has four or fewer questions.
- Every rep has connected a calendar.
- Team routing is chosen and the host list is checked.
- The link is in every sequence step and reply template.
- Outcomes are recorded after each call.
Let your AI assistant do the setup
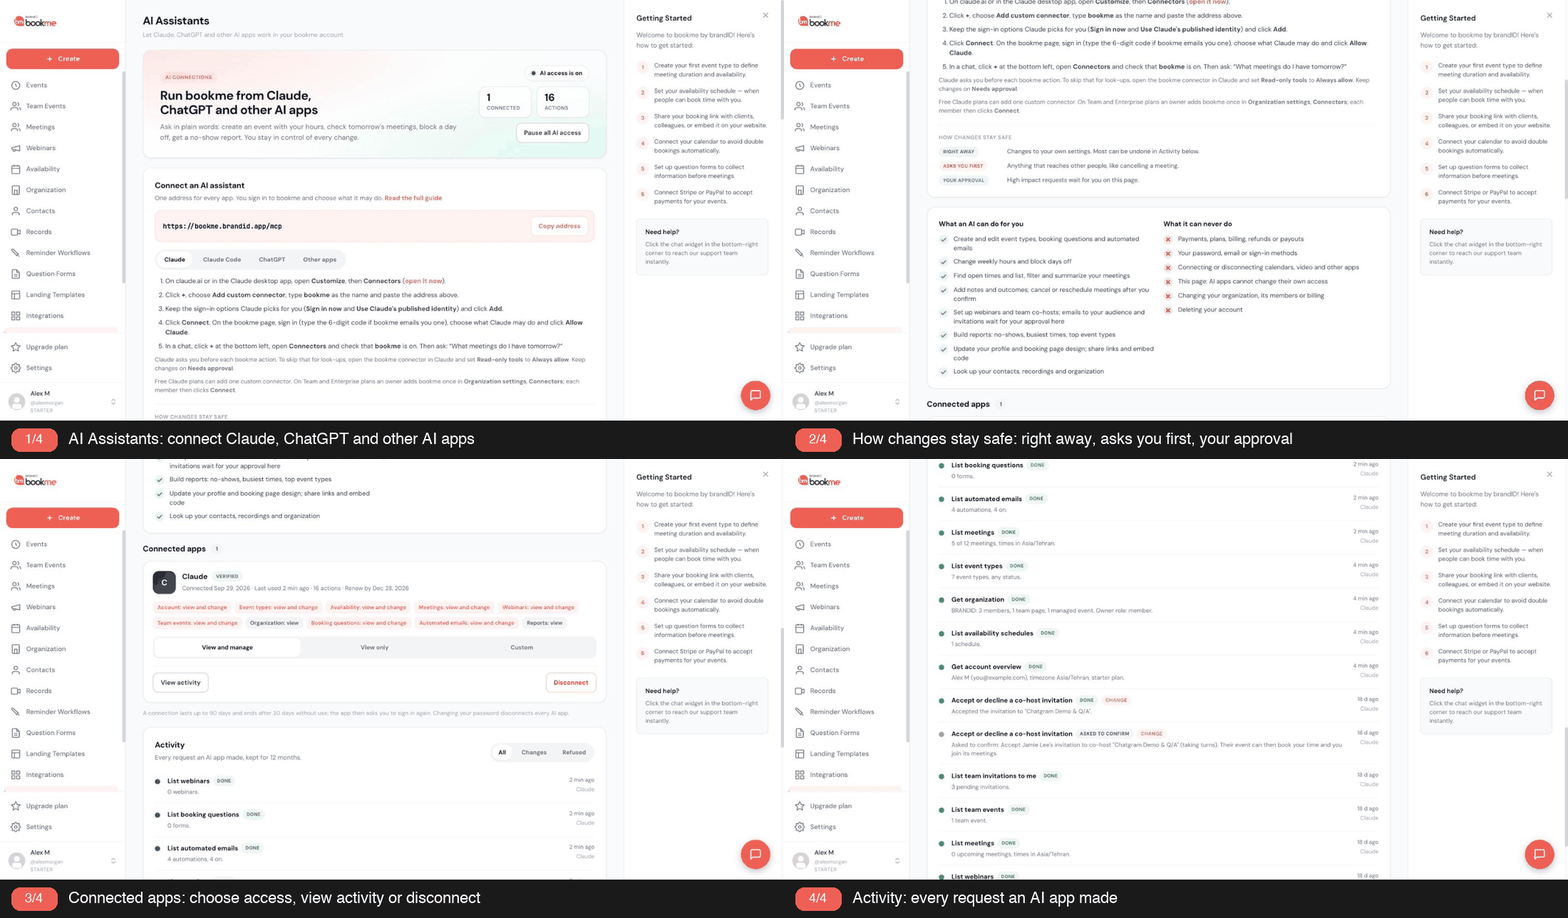
bookme works with Claude, ChatGPT and other MCP apps, so you can describe what you want in plain words and let your assistant build it. Anything that reaches another person, such as cancelling a meeting or emailing an invitee, waits for your approval first. Here is an example request for sales:
Create a 30 minute demo event with four intake questions, give it a round robin team of three hosts and add a reminder one hour before each call.
Setup guide: how to connect Claude to bookme.
Words you will see
- Event type. A meeting you offer, with its own length, location, price and rules.
- Schedule. A set of weekly hours that events can follow.
- Booking window. How much notice you need, and how far ahead people can book.
- Buffer. Time kept free before or after a booking.
- Question form. Custom questions invitees answer before they book.
- Collective event. All hosts attend, and a time is offered only when every required host is free.
- Round robin. Hosts take turns, with one host per booking.
- Email workflow. An email sent automatically before, after or around a meeting.
- Outcome. What happened to a meeting: Met, No-show, I missed it or Decided to reschedule.
Frequently asked questions
Can bookme share meetings between reps?
Can I ask the prospect questions before the call?
What happens if a prospect does not show up?
Does the prospect need an account?
Can I run bookme from Claude or ChatGPT?
Ready to try it?
Create your account, build one demo event with your qualifying questions, and add the link to the next step in your outbound sequence.